
Render failure is more common than most homeowners expect, and it rarely happens without reason. Whether you are noticing fine hairline cracks spreading across a wall, blistering patches bubbling up beneath the surface, or chunks of render breaking away entirely, each of these problems has an identifiable cause. Understanding what went wrong is the first step to fixing it properly and making sure the same issue does not return after the repair is done.
The Three Main Types of Render Failure
Render failure generally shows up in one of three ways: cracking, bubbling, or delamination where the render separates from the wall and falls away. While these problems can sometimes share root causes, each type of failure has its own triggers and visual patterns. Cracking is the most common, bubbling is usually moisture related, and render falling off typically points to a bonding or substrate problem. Each one is worth understanding on its own terms.
What Causes Render to Crack?
Cracking is the most frequently seen form of render failure and it can stem from several different sources. One of the most common is an incorrect mix ratio where too much cement in the mix causes the render to shrink aggressively as it dries, producing a network of fine cracks across the surface. Applying render too thick in a single coat is another frequent cause, as the outer layer dries faster than the material behind it and pulls apart under the tension.
Inadequate curing is also a major factor. When render dries too quickly due to heat, wind, or direct sun, the surface shrinks before the body of the render has had time to harden properly. Substrate movement caused by minor settlement or temperature fluctuations can also crack a rigid render, particularly cement-based products that have little flexibility. On large surfaces, the absence of control joints gives the render nowhere to accommodate movement, and cracking becomes almost inevitable over time.
What Causes Render to Bubble or Blister?
Bubbling and blistering are almost always related to moisture. The most common cause is moisture being trapped behind the render at the time of application, either because the substrate was too wet when the render was applied or because water had already penetrated the wall from another source. As moisture tries to escape through the render, it pushes outward and creates blisters on the surface.
Painting over render before it has fully cured is another common trigger. Fresh render needs time to release its moisture, and sealing it prematurely with a non-breathable paint traps that moisture inside the wall. Rising damp is also a significant cause of bubbling, particularly in older homes where moisture travels up through the base of the wall and pushes through from behind. Catching bubbling render early is important because leaving it untreated allows moisture to continue working behind the surface and the damage will spread.
What Causes Render to Fall Off?
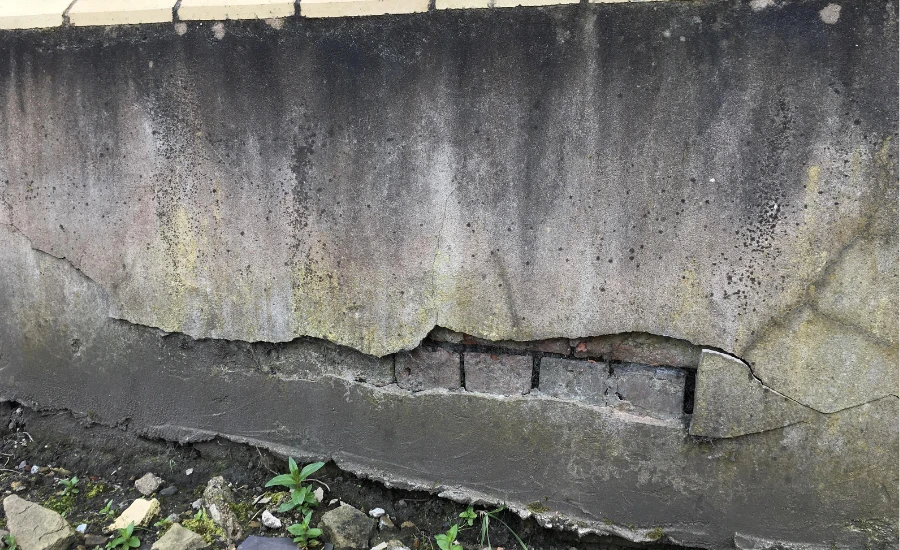
Render falling away from the wall, known as delamination, is usually the result of a bonding failure between the render and the substrate beneath it. Poor surface preparation is the most common starting point. If the wall was not properly cleaned before rendering, or if it was not dampened to reduce suction, the render never forms a strong bond with the surface and will eventually pull away.
On smooth or low-absorption surfaces, failing to apply a bonding agent is a frequent mistake that leads directly to delamination. Render applied over a friable or unstable surface, where the existing material is soft, dusty, or flaking, will also lose adhesion over time as the substrate beneath it continues to break down. Incompatible render products used in layers, for example applying a hard cement-based finish over a flexible base coat, can cause the layers to separate as they move differently in response to temperature changes. Water ingress that has worked its way behind the render over time will also undermine the bond and eventually cause sections to fall away. If you are dealing with render that has already started to separate, getting a proper assessment before attempting repairs is important, and understanding the scope of the work involved in render repair will help you plan the right approach and avoid the same failure recurring.
The Role of Poor Workmanship
Many render failures that appear to be material or environmental problems are actually the result of poor workmanship during application. Rushing through preparation steps, skipping the scratch coat, applying render in a single thick pass, using the wrong product for the substrate, or failing to follow manufacturer guidelines can all lead to premature failure regardless of how good the material itself is. Experienced renderers understand that the quality of the finished surface depends as much on what happens before the render goes on as on the application itself.
How Weather and Environmental Conditions Contribute
Environmental conditions play a significant role in how long render lasts. UV exposure gradually breaks down older cement-based render, making it more brittle and prone to cracking over time. Coastal salt air attacks the render surface and can accelerate weathering significantly in suburbs close to the ocean. Heavy or persistent rainfall drives water into any existing cracks and expands the damage from the inside. Extreme heat during application causes moisture to leave the render too quickly, while cooler climates with freeze and thaw cycles put ongoing stress on the render surface. Choosing a render type suited to your specific environment reduces the impact of these factors considerably.
How to Tell If Your Render Needs Repair or Replacement
Not all render damage requires a full replacement. Surface hairline cracks and small isolated patches of damage can often be repaired without disturbing the surrounding render. A useful way to assess the extent of the problem is to tap the surface gently with your knuckles across different areas of the wall. A solid sound indicates the render is still well bonded, while a hollow sound suggests the render has separated from the substrate beneath and that section will need to be removed and re-done. Widespread hollow areas, structural cracking, or moisture damage behind the surface are all signs that a more extensive repair or full replacement is the better path forward.
How to Prevent Render Failure
Prevention comes down to doing the fundamentals correctly from the start. Choosing the right render type for your substrate and local environment, preparing the surface thoroughly before application, applying render in the correct thickness across multiple coats, incorporating control joints on large surfaces, curing the render slowly and properly, and engaging a qualified and experienced renderer are all factors that significantly reduce the risk of failure. Most render problems are avoidable, and the ones that are not can at least be caught early if you know what to look for.
Wrapping Up
Render failure is rarely random. Cracking traces back to mix ratios, thickness, curing, and movement. Bubbling points to moisture trapped during or after application. Render falling off indicates a bonding failure rooted in poor preparation or incompatible products. In every case, the damage has a cause and addressing that cause is what separates a lasting repair from one that fails again within a few years. If your render is showing signs of deterioration, the earlier you act the simpler and less costly the solution is likely to be.
Keep creating, innovating, and inspiring with Content Ideators every day.