
You’re in the middle of something. A funny error message just popped up. Or maybe your friend sent you something hilarious and you need to save it. Or you’re trying to explain a problem to tech support.
The fastest solution? Screenshot.
On a Mac, taking a screenshot is honestly one of the most satisfying things once you know how. Three keys. One tap. Done. But there’s a whole world beyond that basic move — and once you know all the options, you’ll wonder how you ever lived without them.
Let’s go through everything.
Quick Reference:
| Method | Shortcut | What It Does |
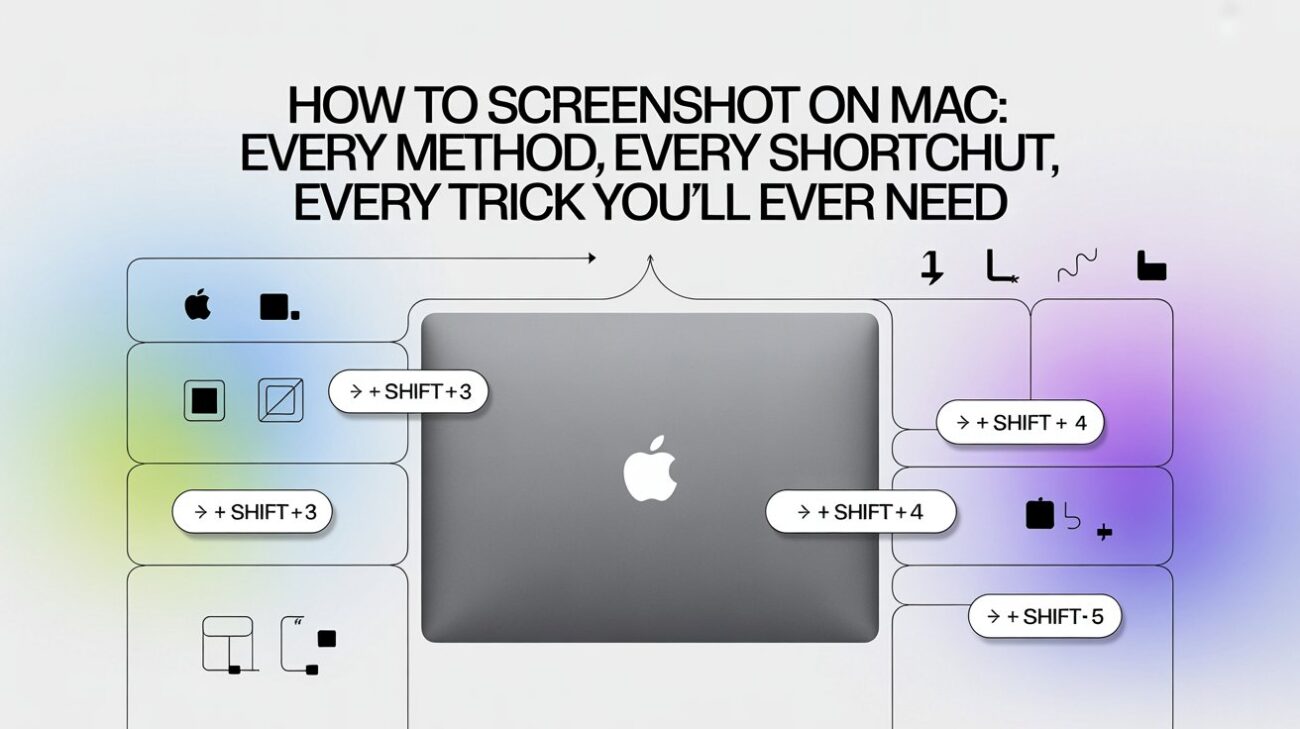
| Full screen capture | Command + Shift + 3 | Grabs everything visible on your display |
| Custom area capture | Command + Shift + 4 | You drag to pick exactly what you want |
| Single window capture | Command + Shift + 4, then Spacebar | Click any window to capture just that one |
| Screenshot toolbar | Command + Shift + 5 | Opens a full panel with all options |
| Touch Bar capture | Command + Shift + 6 | Captures the Touch Bar strip (older MacBooks) |
| Copy to clipboard instead | Add Control to any shortcut | Saves to clipboard, not desktop |
| File format | .PNG | Default for all screenshots |
| Default save location | Desktop | Changes if you set a custom folder |
| Available from | macOS Mojave (10.14) onward | All shortcuts work on M1, M2, M3, M4 |
The Shortcut That Captures Everything at Once
Let’s start with the most basic one. The one you’ll use when you just need to grab whatever is on your screen right now.
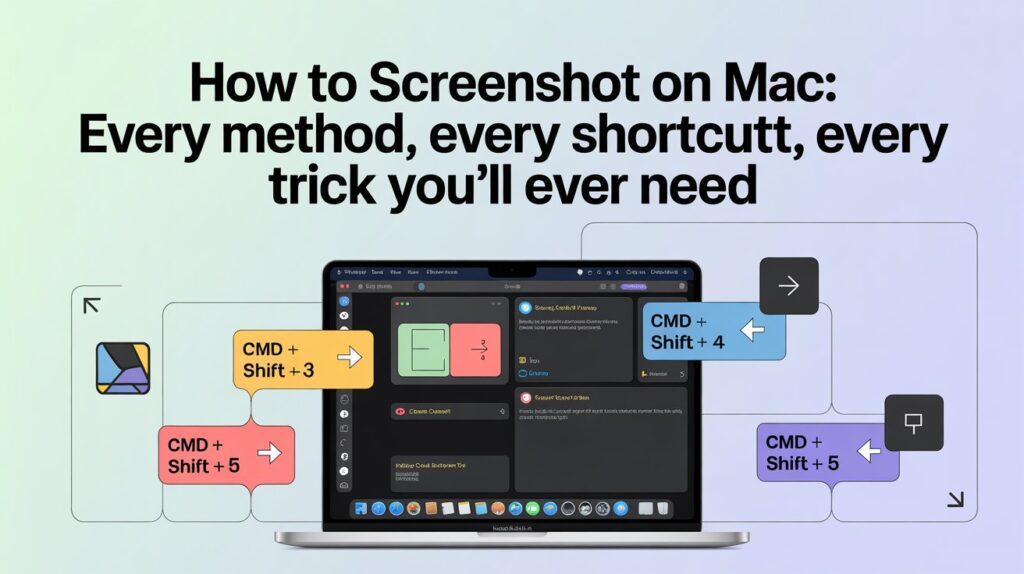
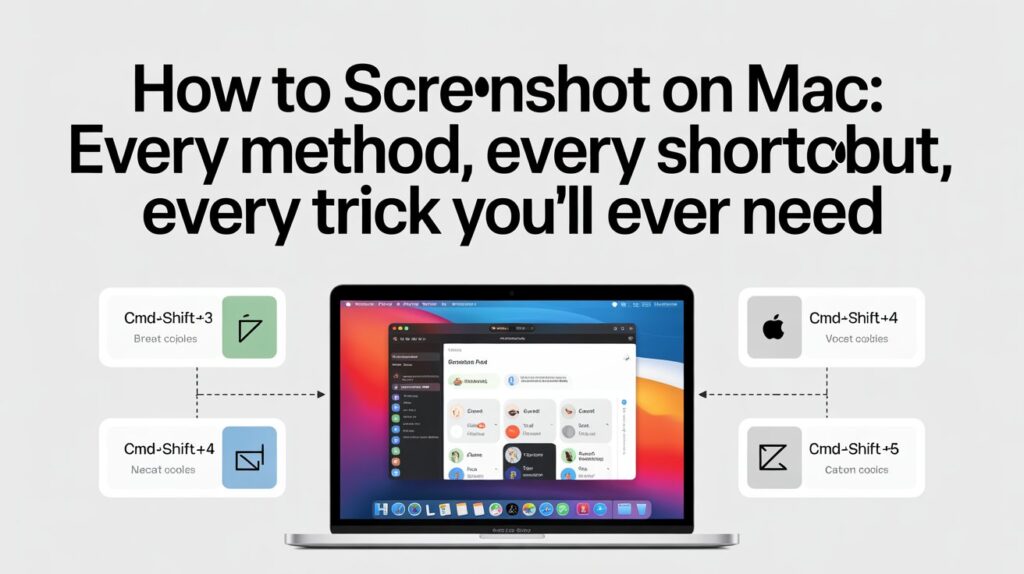
Simultaneously press Command, Shift, and 3.
That’s it. Your Mac takes a photo of your entire display instantly. A small thumbnail pops up in the bottom right corner of your screen. You can ignore it and it saves itself to your desktop automatically. Or you can click it to edit right away.
The file lands on your desktop as a .PNG image. It gets named something like “Screenshot 2025-05-18 at 10.32.45” with the exact date and time baked in. You’ll never mix up which screenshot came from when.
This shortcut works on every single Mac — MacBook Air, MacBook Pro, iMac, Mac Mini. Every model. Every chip generation. Same keys.
See also “How To Retrieve Deleted Instagram Messages: Every Method That Actually Works in 2026“
The One That Most People Use Daily
Here’s the shortcut that most Mac users eventually make their default. It gives you control without slowing you down.
Press Command + Shift + 4.
Your cursor instantly turns into a tiny crosshair. Move it to any corner of the area you want to capture. You can draw a box around just what you need by clicking and dragging. When you let go of the mouse, the screenshot is taken.
You only capture what’s inside that box. Nothing else. No messy cropping needed afterward.
Most people learn this method by accident. While you’re still dragging — before you let go — you can hold the Spacebar. The entire selection box freezes in size and you can slide it around to reposition it. Let go of the Spacebar and keep adjusting the size again. This is a genuine lifesaver when you’re trying to hit a precise area.
Changed your mind? Just press the Escape key. The whole thing cancels. No screenshot taken. Start over whenever you’re ready.
Capturing One Specific Window — Clean and Professional
Sometimes you don’t want a random chunk of screen. You want one specific window — clean, neat, no background clutter showing.
Start with Command + Shift + 4 again. But this time, immediately press the Spacebar right after.
Your cursor transforms into a small camera icon. Move it over any open window on your screen. That window gets highlighted in a soft blue tint. Click on it. Done.
The screenshot captures just that window. And here’s the really nice part — Mac automatically adds a subtle drop shadow underneath the window, making it look polished and professional.
Don’t want the shadow? No problem. When you hover over the window with the camera icon, hold down the Option key before clicking. The shadow disappears. You get a perfectly flat, clean window capture.
This works for more than just app windows too. You can capture menus, the Dock, the menu bar at the top, and even floating dialog boxes. Hover the camera over any of those and click.
The Screenshot Toolbar — Your Control Center
Apple built a full screenshot control panel into macOS. Most people never even open it.
Press Command + Shift + 5.
A small horizontal toolbar appears at the bottom of your screen. It has five icons across the top representing every capture type, plus an Options button on the right side.
The five icons let you:
- Capture the whole screen
- Capture a single window
- Capture a selected area
- Record the entire screen as video
- Record a selected area as video
The Options button is where things get really useful. Click it and you’ll see choices like:
- Timer — Set a 5 or 10 second delay before the screenshot fires. Perfect when you need to open a menu or hover over something to show it in the screenshot.
- Save location — Change where screenshots land. Desktop, Documents, a specific folder, or even directly to Mail or Messages.
- Show mouse pointer — Choose whether your cursor appears in the screenshot or not.
- Show floating thumbnail — Turn the little preview thumbnail on or off.
This toolbar is perfect for anyone who wants full control without memorizing every individual shortcut.
Saving to Clipboard Instead of the Desktop
Here’s a workflow change that makes a huge difference once you try it.
Normally every screenshot saves as a file on your desktop. Which is fine — until your desktop looks like a screenshot graveyard.
Add Control to any screenshot shortcut and the image goes straight to your clipboard instead of creating a file. Then just paste it wherever you need it.
For example:
- Control + Command + Shift + 3 — full screen straight to clipboard
- Control + Command + Shift + 4 — selected area straight to clipboard
Now you can paste directly into an email, a Slack message, a Google Doc, a design tool — anywhere that accepts image paste. No file created. No desktop clutter. Just instant paste.
Once you build this habit, you’ll use it constantly.
The Touch Bar Screenshot (For Older MacBooks)
If you have a MacBook Pro made between 2016 and 2021, you might have a Touch Bar — that thin strip of touchscreen that replaced the top row of function keys.
Press Command + Shift + 6 to capture whatever is currently displayed on your Touch Bar.
The screenshot saves to your desktop just like the other methods. It produces a very wide, very thin image showing exactly what was on the strip at that moment. Useful if you’re creating documentation, a tutorial, or just showing someone what your Touch Bar looks like.
Most newer MacBooks dropped the Touch Bar, so this shortcut won’t do anything on current models. If you press it and nothing happens, that just means your Mac doesn’t have a Touch Bar. Nothing is broken.
Editing Your Screenshot Right After Taking It
You don’t need to open a separate app to do basic edits. Mac handles this automatically.
After taking a screenshot, a small thumbnail preview appears in the bottom right corner of your screen. It stays there for about five seconds. If you click it before it disappears — it opens directly in the Markup editor.
Inside Markup you can:
- Draw with a pen or pencil
- Add shapes like rectangles, circles, and arrows
- Type text anywhere on the image
- Add your signature
- Crop the screenshot
- Adjust color and exposure slightly
For most everyday annotation needs — circling something, adding an arrow, typing a quick note — Markup handles it without needing any third-party app.
If the thumbnail disappears before you click it, just find the screenshot on your desktop and double-click it. It opens in Preview, which has the same Markup tools available under the Tools menu.
Recording Your Screen — Same Shortcut, Different Button
The Command + Shift + 5 toolbar does double duty. Those last two icons aren’t for screenshots — they’re for screen recording.
Click the fourth icon (record whole screen) or the fifth icon (record selected area). Hit the record button that appears, or just click anywhere on screen.
Your Mac starts recording everything happening on screen as a video. A tiny stop button appears in your menu bar at the top of the screen. Click it when you’re done. The video saves as a .MOV file in your chosen location.
Want to record with sound? Click the Options button in the toolbar before you start. Under Microphone, select which input you want. Your voice will be captured alongside the screen recording.
Making tutorials, reporting software defects, or recording a video call for evaluation are all really beneficial uses for this.
Where Screenshots Are Stored and How to Modify It
By default, every screenshot lands directly on your desktop. The naming format is: Screenshot [date] at [time].png.
You always know exactly when you took it. That’s helpful. But 40 screenshots on your desktop starts looking chaotic fast.
You can change the default save location through the Command + Shift + 5 toolbar. Click Options and look at the save location at the top. Click Other Location to browse for any folder on your Mac.
In their Documents folder, some users make a special “Screenshots” folder.. Others save directly to a project folder while working. Set it once, and every future screenshot lands exactly where you want it.
You can also switch back to Desktop anytime by going through the same Options menu.
When Screenshots Stop Working — What to Try
Mac screenshots are reliable, but occasionally things break. Here’s how to fix the most common problems.
The shortcut does nothing at all. This usually means another app has claimed that key combination. Check your keyboard shortcuts by going to System Settings → Keyboard → Keyboard Shortcuts → Screenshots. Confirm the checkboxes are ticked. If a conflict exists, you’ll see it there.
Screenshots save somewhere unexpected. Open the Command + Shift + 5 toolbar and check Options → Save To. It might be pointing to a folder you forgot you changed it to.
The thumbnail never appears. Go back into the Command + Shift + 5 toolbar Options. Check whether “Show Floating Thumbnail” is turned on.
Certain apps won’t let you screenshot. This is intentional. Apps like Netflix, Disney+, Apple TV, and DVD Player block screenshots to protect copyrighted content. This is a feature, not a bug. The screenshot shortcut simply won’t work inside those apps.
Storage is full. If your Mac’s drive has almost no space left, screenshot files can’t save. Check your storage at Apple Menu → About This Mac → More Info → Storage. Free up space by deleting files or moving them to an external drive.
Restart fixes many random issues. If nothing logical explains why screenshots stopped working, a simple Mac restart resolves it the majority of the time.
Privacy — The One Thing Most People Forget
Here’s something worth thinking about before you start sharing screenshots everywhere.
Your screen contains personal information all the time. Email addresses visible in a browser. Phone numbers in conversations. Credit card details in a form. A notification peeking in from a banking app. Your location in a maps window.
When you take a screenshot, all of that information gets captured too — even parts in the background that you weren’t paying attention to.
Before sharing a screenshot publicly or sending it to someone you don’t know well, take ten seconds to look it over completely. Use Markup to crop away sensitive edges or blur out anything personal. This habit protects you more than you might realize.
Final Words
Taking a screenshot on a Mac is one of those skills that takes about two minutes to learn and then saves you time every single day for the rest of your life.
The full-screen shortcut Command + Shift + 3 does the job instantly when you need everything. Command + Shift + 4 gives you the power to grab exactly the right section. Adding Spacebar gets you a clean single window. Control added to any shortcut sends it straight to clipboard without touching your desktop. And Command + Shift + 5 opens the full toolbar when you want complete control or need to record your screen.
That’s the whole toolkit. Simple keys. Huge power.
Once you get these shortcuts into your muscle memory — and it only takes a day or two of practice — you’ll barely think about it anymore. Your fingers just know. Someone asks you to show them something. You hit three keys. Done.
That’s the Mac experience at its best.
FAQs
1. What is the basic shortcut to screenshot on a Mac?
Press Command + Shift + 3 to capture your entire screen instantly. The screenshot saves as a PNG file on your desktop.
2. How do I screenshot only part of the screen?
Press Command + Shift + 4. Your cursor becomes a crosshair. Click and drag to select the exact area you want. Release to capture. Press Escape to cancel if needed.
3. How do I screenshot one specific app window?
Press Command + Shift + 4, then immediately press Spacebar. Your cursor becomes a camera icon. Hover over any window to highlight it, then click to capture just that window with a drop shadow.
4. How do I remove the drop shadow from a window screenshot?
When using the camera icon method (Command + Shift + 4 → Spacebar), hold the Option key before clicking. The shadow is removed and you get a flat, clean capture.
5. How do I take a screenshot directly to clipboard instead of saving a file?
Add the Control key to any shortcut. For example, Control + Command + Shift + 3 captures the full screen and copies it to your clipboard so you can paste it directly into any app.
6. What is Command + Shift + 5 and when should I use it?
It opens the Screenshot toolbar — a control panel with all capture options plus screen recording. Use it when you want to set a timer delay, change the save location, toggle mouse pointer visibility, or record your screen as video.
7. How do I set a timer so the screenshot fires after a delay?
Open the toolbar with Command + Shift + 5. Click Options. Select either 5 Seconds or 10 Seconds under the timer section. The screenshot will fire after your chosen delay, giving you time to open menus or set up what you want to capture.
8. How do I record my screen on Mac?
Press Command + Shift + 5 to open the toolbar. Select either “Record Entire Screen” or “Record Selected Portion.” Click Record or click anywhere on screen to begin. Click the stop button in your menu bar when finished. The video saves as a .MOV file.
9. How do I record my screen with audio?
Open the toolbar with Command + Shift + 5. Click Options. Under Microphone, select your built-in microphone or any connected audio input. Then start recording normally.
10. Where are my screenshots saved?
By default, all screenshots save to your desktop as PNG files named with the date and time. You can change this location in the Command + Shift + 5 toolbar under Options → Other Location.
11. Why are my screenshot shortcuts not working?
The most common causes are: another app has taken over that keyboard shortcut, the shortcuts are disabled in System Settings → Keyboard → Keyboard Shortcuts → Screenshots, your storage is full, or a specific app has blocked screenshots. Try restarting your Mac first as that fixes many random issues.
12. Why can’t I screenshot Netflix or other streaming apps?
Streaming apps like Netflix, Disney+, and Apple TV intentionally block screenshots to protect copyrighted content. This is expected behavior. No workaround exists through normal Mac screenshot methods.
13. How do I edit a screenshot right after taking it?
Click the small thumbnail preview that appears in the bottom right corner immediately after taking a screenshot. It opens in the Markup editor where you can add text, shapes, arrows, and crop the image. If you miss the thumbnail, find the file on your desktop and open it in Preview for the same tools.
14. What file format do Mac screenshots save in?
PNG by default. PNG files are high quality and work in virtually every app, website, and email client. If you specifically need JPEG or another format, you can convert the file in Preview or change the format in some third-party screenshot apps.
15. Do these screenshot methods work on all Mac models?
Yes. Command + Shift + 3, 4, and 5 work identically on MacBook Air, MacBook Pro, iMac, Mac Mini, and Mac Pro — across all chip generations including Intel, M1, M2, M3, and M4. The only shortcut limited to specific hardware is Command + Shift + 6 for Touch Bar, which only applies to MacBook Pro models made between 2016 and 2021.
Keep creating, innovating, and inspiring with Content Ideators every day.